How to Use Quick Post vs Full Shipment in Trulos Dispatch
This guide explains the difference between the Quick Post form and the Full Shipment form in Trulos Dispatch, and walks you through how to use Quick Post to add loads quickly and post them to the Trulos Load Board.
Applies to: Trulos Dispatch web app · Roles: Dispatcher, broker, shipper.
Trulos Dispatch includes two ways to create a load: the Full Shipment form and the shorter Quick Post form. Both start from the same Add Shipment window, but they serve different purposes.
The Full Shipment form is designed for complete dispatch workflows, paperwork, invoicing, and detailed load history. The Quick Post form focuses on the essentials so you can post loads to the Trulos Load Board quickly without filling out every shipment field.
This article focuses on how to use the Quick Post tab, when it makes sense to use it, and how it works alongside your saved customers and addresses.
In this guide you'll learn how to:
- Open the Add Shipment window from the admin page
- Switch between the Quick Post and full shipment forms
- Fill out the Quick Post fields for fast load posting
- Reuse saved origin and destination cities/states
- Reactivate expired loads and update the date
Quick navigation
Overview – Quick Post vs Full Shipment
When you click Add Shipment in Trulos Dispatch, you'll see two tabs inside the shipment window: Full Shipment and Quick Post.
Use Full Shipment when you want to enter detailed origin and destination addresses, multiple products, carrier and driver details, and pricing for your back-office workflow.
Use Quick Post when you primarily need to:
- Post a load to the Trulos Load Board quickly
- Enter only basic origin/destination city & state, equipment, and rate
- Reuse simple city/state locations for repeat lanes
| Option | Best for | Typical use |
|---|---|---|
| Quick Post | Fast posting to the Trulos Load Board | Enter date, cities/states, equipment, load size, specs, and contact info. |
| Full Shipment | Complete dispatch & back-office workflow | Enter full addresses, products, carrier, documents, and pricing details. |
Step 1 – Open Add Shipment and choose Quick Post
From the main Dispatch admin page, click the Add Shipment button at the top of the screen. This opens the shipment entry window.
At the top of the window, select the customer you're creating the load for. Once the customer is selected, click the Quick Post tab to switch from the full form to the shorter Quick Post form.
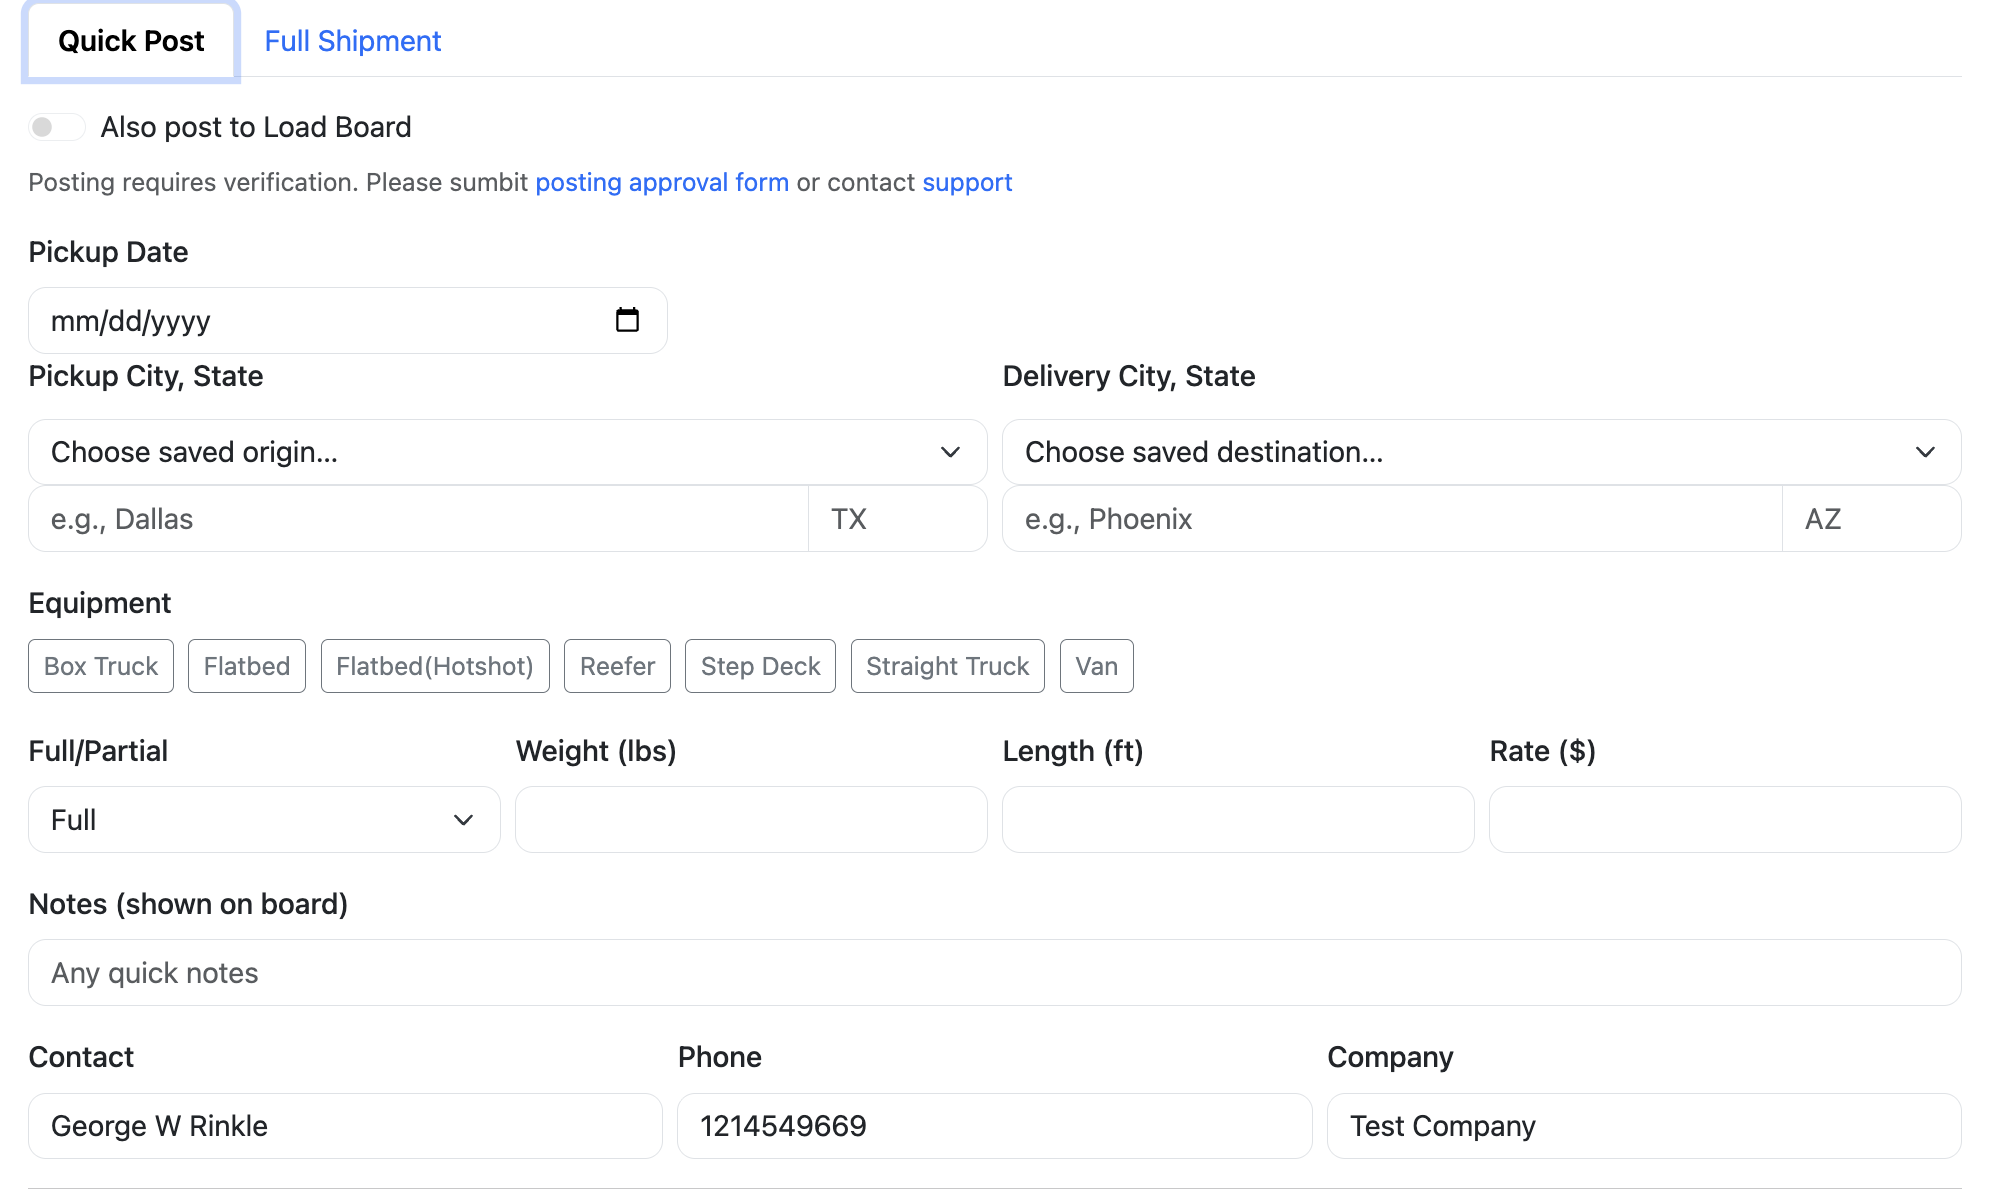
Step 2 – Fill out the Quick Post form
The Quick Post form contains only the fields you need to quickly create a shipment and post it to the load board. Work your way from top to bottom:
- Shipment Date — Select the pickup or start date for the load.
- Origin & Destination — Choose from your previously saved city/state entries, or type in a new city and state.
- Equipment — Select the equipment type needed (for example, flatbed, van, or reefer).
- Load Size — Indicate whether the load is Full or Partial.
- Weight, Length, and Rate — Enter your main load specs and the rate you want to offer.
- Contact Information — This is auto-filled from your profile, but you can adjust the name, phone, or email for this specific load if needed.
When everything looks good, click Save. The shipment will appear in your admin view alongside your other loads, and if posting is enabled for your account it can be published to the Trulos Load Board from there.
Step 3 – Use and manage saved origin/destination addresses
As you use Quick Post, Trulos Dispatch automatically saves the origin and destination city/state combinations you use for each customer. This makes it easier to repeat common lanes without retyping them every time.
When you open the origin or destination dropdown on the Quick Post form, you'll see a list of previously used locations for that customer. Select one to fill the city and state instantly.
Step 4 – Reactivate expired loads from the admin page
When a load you've posted expires, it isn't removed from your system. It stays in your shipment manager so you can reuse it in the future.
To reactivate an expired load:
- Find the shipment on your main Dispatch admin page.
- Update the date by clicking on the date field and selecting a new date from the calendar.
- Use the Post Load switch to turn the posting back on so the load appears on the Trulos Load Board again (if your account is approved to post).
Need help with Quick Post or posting loads?
If you're not sure whether to use Quick Post or the full shipment form, or you'd like help setting up your workflow, reach out to Trulos Support. We're happy to walk through your first loads with you.